Showing posts with label life. Show all posts
Showing posts with label life. Show all posts
Saturday, May 6, 2017
Broken Islands Tidal Life

Was digging through my harddrive and came across a couple videos I shot of marine life in the Broken Islands. Now that youtube lets you upload in HD I thought I would share.
Hermit crabs and a bunch of other critters in a tide pool:
Life in the lagoon. Taken between Jaques and Jarvis Islands in the Broken Group, west coast of Vancouver Island, right about here. Lots of sea stars, lots of shells, and a number of red sea cucumbers.

Friday, September 23, 2016
Breathing new life into our ageing inflatable dinghy
11 March 2015
When we bought the boat we plan to cruise the western Pacific and Asia in for the next decade and beyond, a Whitby 42 cutter rigged ketch, she came with a 3.1m rib that showed clear signs of her 12 years of service since manufacture but seemed solid enough for the time being. Our plan was we would get a new rib before heading off into the deep blue.
Fast forward 12 months in which we have had the masts off, rewired and renewed all associated lights in both, replaced all standing rigging, much of the running rigging, repainted the hull, fitted new pumps, instruments, refrigeration motor and compressor, life raft, along with a myriad of smaller jobs that all eat dollars and our refit budget had taken on a distinctly sickly, pale colour. With a new dinghy, solar panels, AIS and auto-pilot as major items still on the to-do list, some economizing was no longer desirable but compulsory.
By now our poor rib hung from the davits sagging like last birthday’s party balloons. It needed a serious injection of air immediately before every use and we’d dare not go anywhere without taking the pump with us for the return trip. Nonetheless, we started to think twice about the expense of a replacement. To handle our 15hp outboard, we were being quoted $3,500 to $5,500 depending on the make and model so we began researching ways to extend the life of what we had. Let’s hear it for Google and cruiser forums.
 |
| Our RIB before and after. It's amazing what you can do thanks to Google. |
We came across a discussion by people in the U.S.A. who had faced the same dilemma before managing a very successful, DYO rejuvenation of their tired rib. They strongly recommended a range of sealer and paints produced by ‘Inland Marine.’ Armed with the full details off we went to our local chandlery only to be told they had never heard of it and had nothing similar. The story was repeated at two more large and generally well-stocked chandlers so it was back to Google for us.
Despite a lot of looking, we found no Australian stockists at all but thankfully a New Zealand listing did appear. When we read that the business, www.inflatablesealant.com , had been set up by two Kiwi boaters to solely sell this product and nothing else we were a little surprised but even more determined to give it a go. We placed an online order and received a confirmation email within the hour stating it would be delivered to us in Brisbane within the week. The products are water based and as such can be sent by air and arrived as promised. Comprehensive instructions were included. Now we could get on with it.
Step One.
We fully inflated the dinghy and did the soapy water test all over to identify where the leaks were. We soon discovered the worst was in an area of heavy wear near one of the seams.
 |
| The soapy water test soon produced a mini volcano of bubbles revealing much of the air was escaping from an area of heavy wear on the pontoon. |
Step Two.
After half deflating the pontoons, we squirted about 230mls of the ‘Inland Marine Sealant’ past the valve and into each chamber. We were then careful to rinse each valve with a small amount of fresh water to prevent them getting stuck up by the sealant.
Step Three.
We re-inflated the pontoons just enough to make them rigid then slowly rolled the boat over side to side and end for end a number of times to make sure the entire insides of the chambers were coated. After that it was a case of just turning once each half-hour for three hours to prevent any pooling. We then left the boat overnight.
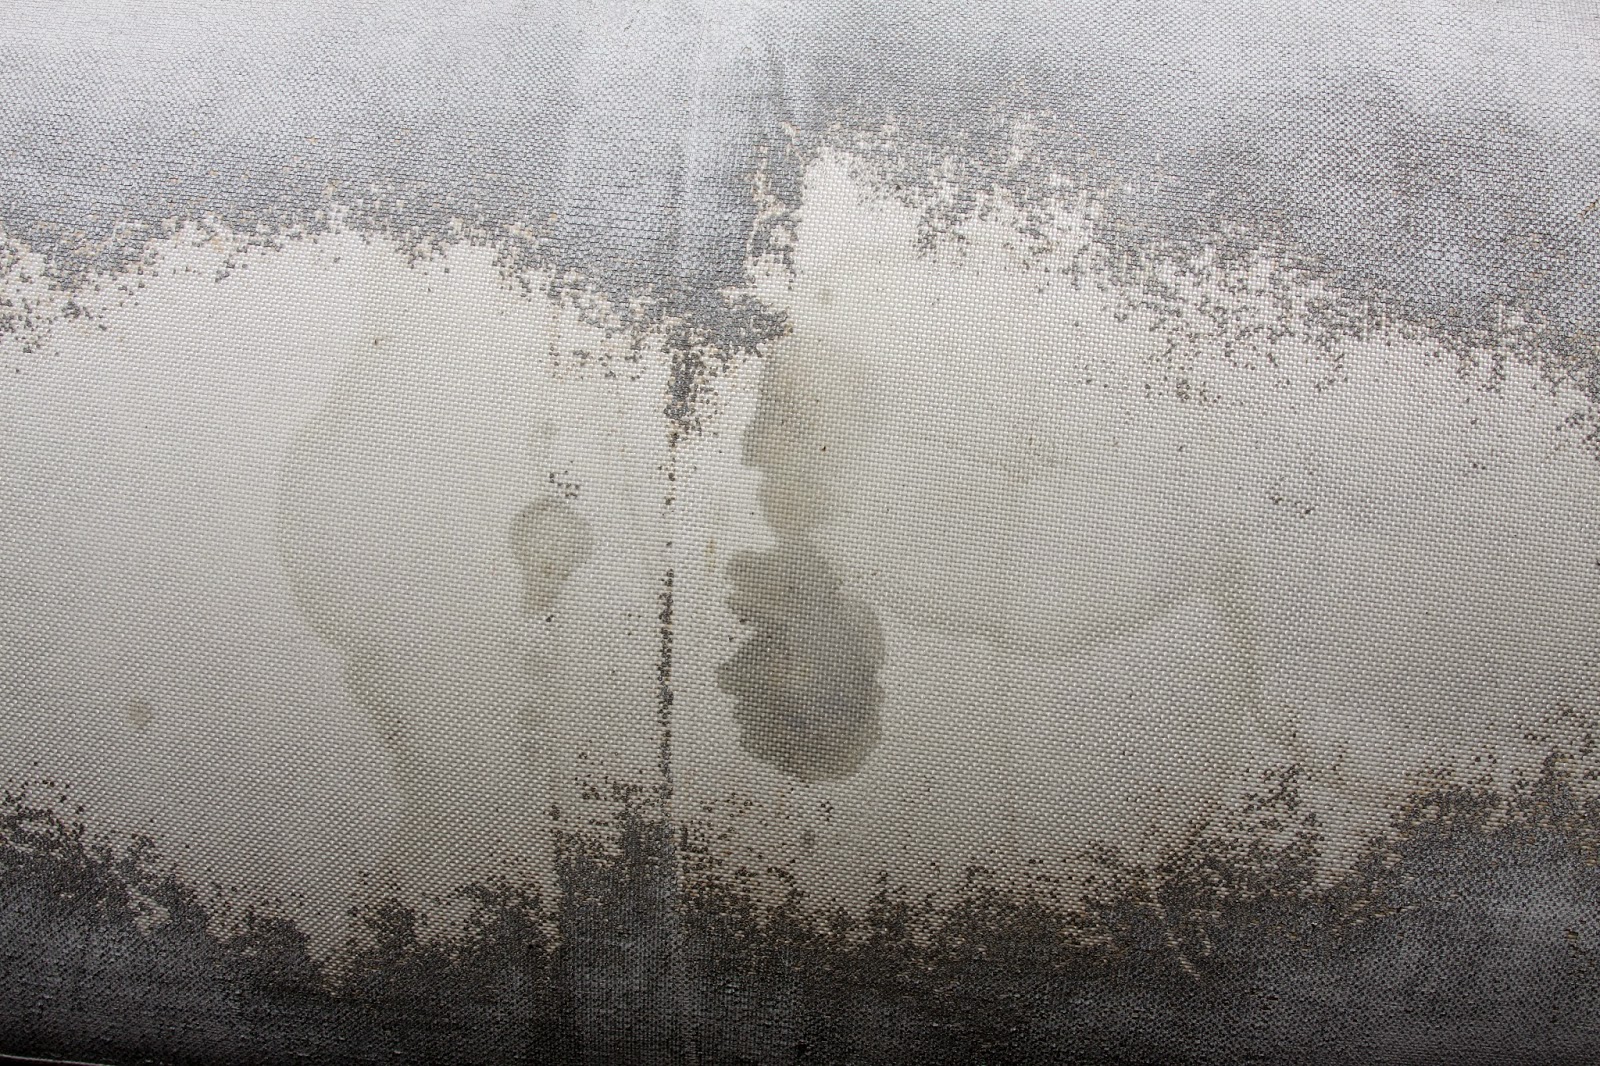 |
| Here's a view of the same area after inserting the sealer into the pontoons showing where it has bled through the porous fabric from the inside very effectively stopping the leaks. |
Step Four.
After inflating everything back to full pressure, we went back over every centimeter with the soapy water test again looking for any leaks but found no sign of escaping air at all. Given the state of our dinghy we had really expected it to need at least two applications of the sealer but, now weeks later, she’s still tight as a drum. Happy days!
Step Five.
We had decided if we were going to breath new life into old saggy bottom we also wanted to make her look good and provide the exterior of her hypalon pontoons some added protection from the elements. The aluminum hull was sanded and then received two coats of primer before another couple of coats of shiny bright ‘Marker Yellow’ marine enamel. (We desperately hope our dingy is never upturned in the ocean in need of spotting from the air but, if that should ever arise, we’d rather she is highly visible.)
 |
| The liberal use of masking tape produced a good finish between colours. |
Step Six.
The underneath of the pontoons was then hand sanded with 100 grit to rough up the surface before being washed off with water and then thoroughly wiped over with acetone. We masked up the hull and rub strake before putting on two coats of the ‘Inland Marine Topside Paint’ in grey. You do need to allow three hours between coats but the product was very easy to apply and using a good quality brush minimised stroke marks in the paint.
 |
| Before and after shot illustrates the difference two coats of paint can make. |
 |
| We're hoping no rescue aircraft ever gets this view but better safe than invisible. |
Step Five.
It was now time for the top. Grab handles that had fallen off were re-bonded back on using two-part inflatable boat adhesive from ‘Polymarine Ltd’ following the simple instructions provided. We then repeated the prep discussed above but in our theme of making the dinghy easy to see, the tops and insides of the pontoons were painted in yellow with just the reinforced seating pads in the grey for contrast.
Step Six.
After the inside of the hull was spruced up with two coats of white we were done. Our twelve-year-old dinghy was now ready for many more happy years as a teenager, although most people think we have a new baby until we tell them the story of her makeover. None of the work was difficult, and all the products used came with easy to follow instructions. However, the process does take a number of days due to the curing time between coats etc.
 |
| The finished product ready for many more years of service. |

 |
| All the products used in our makeover. |
Budget $AUD
Inflatable Sealant $79.95
Topside Paint x 2 $99.95
International delivery $35.00
Polymarine Adhesive $50.00
Primer & Enamel $95.00
Miscellaneous items $50.00
Total $509.95
- The job could be done about $135 cheaper with the pontoons and hull done in one colour rather than our use of grey and yellow topside paint for the pontoons with white and yellow enamel for the aluminium hull.
- For our American readers, a quick check on the internet shows the products are naturally a bit cheaper in the USA than over here, particularly when viewed in $USD.
- In Australia, New Zealand and the Pacific Islands the Inland Marine products are available online from www.inflatablesealant.com who provided us with excellent service.
- For our American readers, a quick check on the internet shows the products are naturally a bit cheaper in the USA than over here, particularly when viewed in $USD.
- In Australia, New Zealand and the Pacific Islands the Inland Marine products are available online from www.inflatablesealant.com who provided us with excellent service.
An apology
Since returning to Australia at the end of another European summer’s wanderings around the Med, we have been extremely busy, catching up with friends and family, finishing and publishing our first book, ‘Stuff it. Let’s go sailing anyway’, mounting a very successful exhibition of Karen’s artwork and buying a new boat. While spending much time preparing ‘Our Dreamtime’ to sail off into the western Pacific and South East Asia, we’re also working at finalising the this blog’s story of our adventures in the Med and getting it all back to current so keep checking back for new instalments. However, to stay right up to date with what we’re up to and see lots more photos check out and 'like' our Dreamtime Sail Facebook page at Dreamtime Sail on Facebook

If you have only recently discovered our blog and would like to read how it all started, or work through our previous adventures, click the link to go back to our first blog entry. Stuff it. Let's just go sailing anyway. We hope you enjoy reading the previous posts to catch up on our story.
Friday, August 12, 2016
A day in the life the installer goes to Garmin school
Woke up, fell out of bed
Dragged a comb across my head
Found my way downstairs and drank a cup,
And looking up I noticed I was late.
Found my coat and grabbed my hat
Made the car in seconds flat.
"A day in the life" Sgt Peppers Lonely Hearts Cub Band, circa a long time ago, and slightly stepped on
This is how my day started on Tuesday. Up at 3:00 am, out the door at 4:00 am, drive from Sarasota to Dania Florida (Ft. Lauderdale), grinding through the Miami rush hour traffic in a driving rain storm clutching a map, and arriving at the International Game Fishing Association museum at about 8:30 am. I want to dispel that ugly myth right now, that your installer's days are spent drinking Pina Coladas, and going for boat rides, while charging fees that would make a brain surgeon envious.
.jpg)
So my school day starts at 9:00 am at the International Game Fishing Association's museum, where Garmin has arranged the meeting rooms for the day. I suspect the location selection was not an accident, and it sure beat the meeting rooms at the local airport hotel. The IGFA facility is a stunning modern building, and as you can imagine is filled with world record fishing memorabilia. Garmin representatives check you in, and point you to a buffet filled with bagels, rolls, fruit, and lots of hot coffee.

I was pleasantly surprised at how many installers were there to take the class, and the large number of Garmin staff that were available during the presentations, most of whom were technical staff, although a couple of senior sales staff were present to keep an eye on the technical staff, or was the technical staff there to keep an eye on the sales guys?

Oy vey! do you see the size of the book, and I have to learn all this today? Actually the book is worth its weight in gold. It contains almost every installation manual for Garmin marine products, and a wealth of other technical, and product information. The contents are also on a CD inside the book.

So off we go at 9:oo am, and John Murch does most of the primary technical presentations.


The day relentlessly goes on, there were breaks to refill your coffee, and lunch was provided (the lasagna was bland, and I wished there was some Tabasco to be found). From Chartplotters, to sonar, to radar, a terrific autopilot presentation from Robert Archer, one of the original TR-1 personnel, and software. No Garmin technical subject was left out. There was also virtually every marine product Garmin sells on display to play with.
All of a sudden it is almost 5:00 and it is test time. Seventy five questions later, (I missed three, semantics are everything), you are given the grand prize. The Garmin technical, and good house keeping seal of approval.

I leave at about 6:00, arrive home at 10:00, let the greyhounds girls out, had a bourbon, and passed out.
The following morning, I bestowed some of my new intellectual largess on a client, who had been having some particularly vexing issues. Using one of the hidden diagnostic screens I had learned about, I found a vital clue about what was happening, and shortly the problem was corrected. You can teach an old dog new tricks.
With thanks to Joe Cornwall for the use of the IGFA mueseum photo, Joe is the webmaster of the Fly Fish Ohio website.
Subscribe to:
Posts (Atom)